I’ll be getting a dog soon and started looking around for a way to track it down should it ever escape. There are lots of neat commercial options but most require a monthly subscription, and those that don’t seem to be of dubious quality, so i decided to build my own.
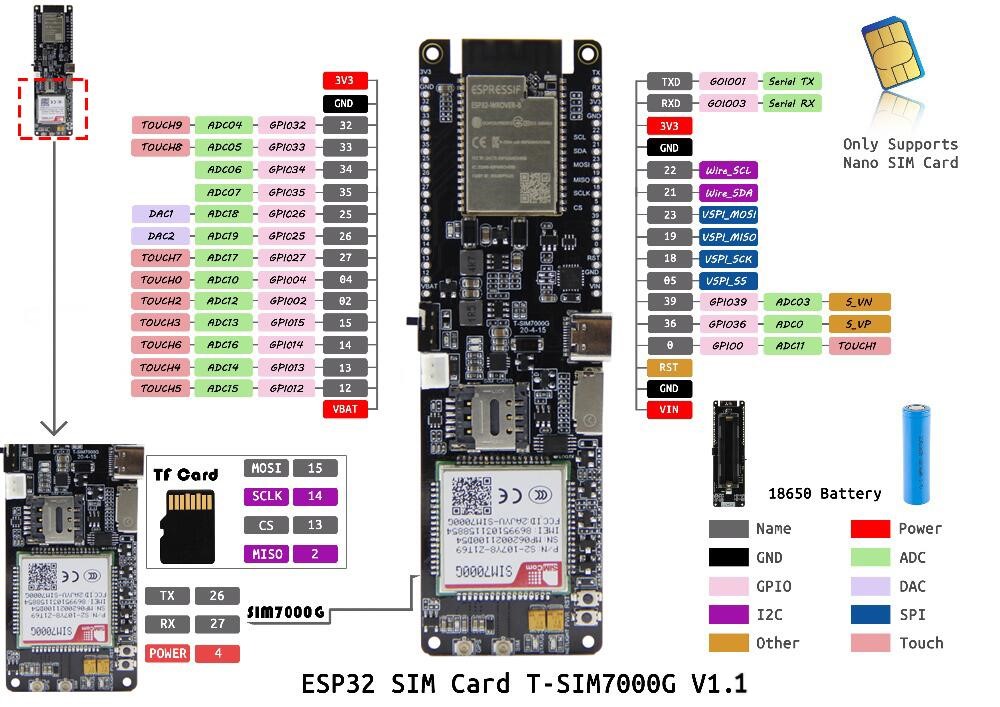
I’ve based the build off the LilyGo-T-SIM7000G which includes an ESP32, SimCom7000G LTE cell modem / GPS receiver, and battery hold / charger for an 18650 lithium battery. The boards can be had from the usual suppliers for around $40, quite a deal for so much functionality. I used the Botletics fork of the Adafruit Fona library as a jumping off point to get the basics working. For cellular connectivity I use Google Fi as my cell provider, so I ordered a Fi data only SIM card. Getting the SIM card was the easy part, connecting the SimCom7000G module to connect to the Fi network was a bit more work. I couldn’t find any reliable documentation on getting the two to work together so it was a bit of trial and error to find that this works reliably:
fona.setNetworkSettings(F("h2g2"), F("h2g2"));
With the board on the network and getting a GPS lock remarkably quickly the next step was to push data to someplace accessible remotely. The Google Fi data only SIM card blocks SMS messages so that was out. The example library I am using references dweet.io so I thought I’d give it a try. Within just a few minutes i was able to post data to dweet and check it via the web. With the basics done and tested its time to dream add some features and optimizations.
More to come as the build continues. You can follow along at the GitHub project here.
I was recently tasked with creating a digital menu for a local company. We went through several options and settled on running dual 4k monitors with a Raspberry Pi 4 displaying a menu made in Google Sheets. Sounds pretty straight forward, and it was, until it came to automatically opening two chromium instances to separate web pages and on different displays.
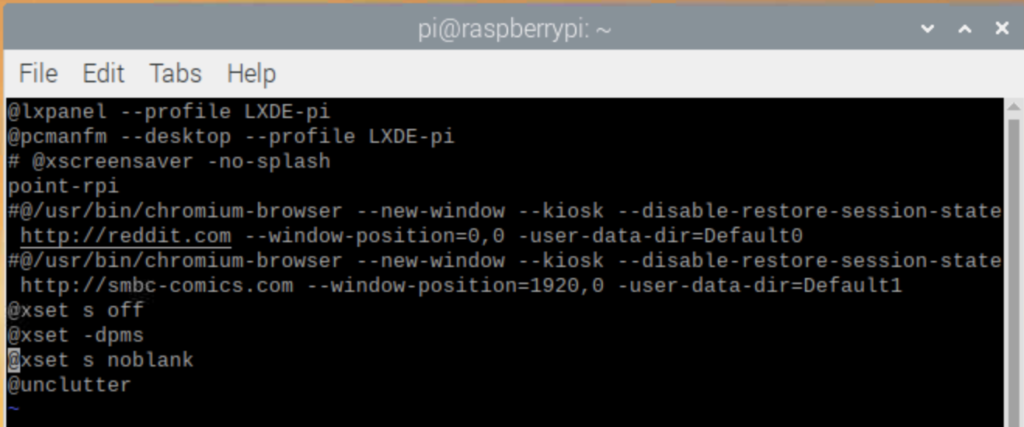
Auto starting one or more instances of chrome is a snap, just add the following to /etc/xdg/lxsession/LXDE-pi/autostart:
But to make two separate windows and have one auto open on each monitor you’ll need to add the following to the end of the command listed above in /etc/xdg/lxsession/LXDE-pi/autostart:
-user-data-dir=default0 --window-position=0,0
and for the second monitor / session you’ll add another @/usr/bin/chromium-browser --new-window --kiosk --disable-restore-session-state http://exampleemailaddress.com -user-data-dir=default0 --window-position=0,0 to /etc/xdg/lxsession/LXDE-pi/autostart changing the last two flags to: -user-data-dir=default1 --window-position=1080,0 (note that this is for a pair of vertically mounted 1080P displays, your value may vary).
Your final /etc/xdg/lxsession/LXDE-pi/autostart will have the following two lines at the bottom:
Lastly you can add the unclutter application to hide the mouse cursor. To add unclutter just open an command prompt and run: sudo apt-get install unclutter then add @unlutter to your /etc/xdg/lxsession/LXDE-pi/autostart file.
Update 2/9/2020:
The menu system has been working fairly well with two exceptions. Updating the menus required using VNC to connect to the raspberry pi, exit presentation mode on both displays, and then re-enter presentation mode. Additionally after reboot the menu’s required manual intervention to be placed into presentation mode. I solved this issue using xdotool, installed by running sudo apt-get install xdotool. This allows me to script keyboard presses so after boot a script presses ctrl+shift+F5 and alt+Escape to enter presentation mode on the selected chrome / google slides instance, then switch to the other instance to repeat.
I solved the refresh issue by slapping together a quick and dirty Python / Flask app that allows users to call the script to exit presentation mode one each chrome instance which will allow slides to grab any changes made to the slides, then after a short delay reenter presentation mode. I also added an option to reboot the Pi’s via the web ui. Here is the Python:
from flask import Flask, render_template, request
import subprocess

app = Flask(__name__)


@app.route('/', methods=['GET', 'POST'])
def index():
    if request.form.get('refresh_button') == 'refresh menu':
        print('resfresh')  # do something
        cmd = ["/somepath/refresh_script.sh"]
        p = subprocess.Popen(cmd, stdout=subprocess.PIPE,
                             stderr=subprocess.PIPE,
                             stdin=subprocess.PIPE)
        out = p.communicate()
        print(out)
    else:
        print('reboot')  # do something else
        cmd = ["/somepath/reboot_script.sh"]
        p = subprocess.Popen(cmd, stdout=subprocess.PIPE,
                             stderr=subprocess.PIPE,
                             stdin=subprocess.PIPE)
        out1 = p.communicate()
        print(out1)
    return render_template('index.html')


if __name__ == '__main__':
    app.run()
and index.html:
<!DOCTYPE html>
<html lang="en">
<head>
    <meta charset="UTF-8">
    <title>Menu Control</title>
</head>
<body>
<form method="post" action="/">
    <p style="text-align: center;font-size:30px">Menu Controller</p>
<div style="text-align: center; border: 1px solid">
    <p>Press Refresh Menu to update the displays. Use this option after updating menus in google slides.</p>
    <p><input type = "submit" name = "refresh_button" class="btn btn-outline-primary" value = "refresh menu" style="height:75px;width:200px;background-color:green;color:black;font-size:30px"/></p>
</div>
    <div style="text-align: center; border: 1px solid">
        <p>Press Reboot to reboot the menus, this will take several minutes to complete. Only use this if the menus are not functioning correctly</p>
<p><input type = "submit" name = "restart_button" class="btn btn-outline-primary" style="background-color:red;color:black" value = "restart menu"  /></p>
    </div>
</form>
</body>
</html>
Its not pretty but its functional and much easier than doing it manually. and finally the bit of bash called to refresh the menu / enter presentation mode on boot:
I recently was handed a project to setup LUA scripting in CIsco iOS to allow for more granular and precise Hostscan checks from a Cisco ASA with the AnyConnect client. I had a hard time finding good documentation for this so here is what I learned. The following is what i created to allow Hostscan to check for the following: 1. selected anti-malware is installed and host has a matching registry key 2. or the endpoint has another selected AM installed 3. or if the endpoint has AM installed and a required file
assert(function() local block_connection = true #check for antimalware install and registry key if (EVAL(endpoint.am[“<antimalware ID#>”].exists,”EQ”,”true”,”string”) and EVAL(endpoint.registry[“<HostScanID>”].value,”EQ”,”<registry value>”,”string”) or #check if the other approved AM is installed (EVAL(endpoint.am[“<antimalware ID#>”].exists,”EQ”,”true”,”string”) or #check if AM solution is installed and a required file exists (EVAL(endpoint.file[“HostScanID”].exists,”EQ”,”true”,”string”) and EVAL(endpoint.process[“HostScanID”].exists,”EQ”,”true”,”string”)) ) then block_connection = false else block_connection = true end return block_connection end)()
The contents of the EVAL() statement were found by creating a test Dynamic Access Policy and attempting to connecting to the VPN, then dumping the log and reviewing the applied DAPs looking for endpoint.am”<antimalwareID#>”. The file and registry EVAL() statement names were set on the ASA under: Remote Access VPN -> Secure Desktp Manager -> Host scan and creating registry and file checks as required.
The biggest struggle was for me finding a valid LUA example so I hope the above is helpful. You can adjust it by changing the values in the <>’s and and adding or removing OR / And statements as required.
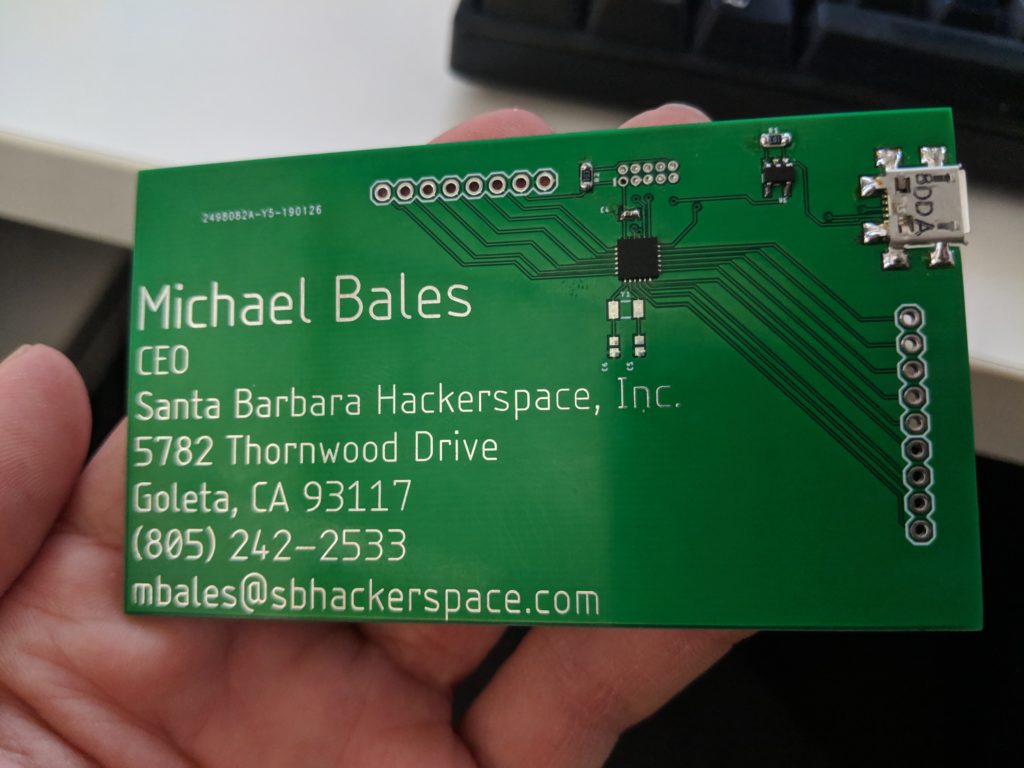
After finally running out of my last batch of paper business cards I decided to change things up on the next round. I’ve seen a handful of PCB business cards over the years and thought it would be fun try it out for myself. The PCB is standard business card size at 3.5 x 2 inches, but much thicker at a maximum of 3mm for the USB port. The text is tin plated copper achieved by placing it on the soldermask resist layer. The final cards will feature black soldermask and ENIG plating. The card has a SAMD11D14 ARM processor, AP2112 LDO supplying 3v, and USB Micro port for communication.
The microcontroller is loaded with the Arduino bootloader and comes programmed with a simple version of Tetris playable over a serial COM port. When plugged in the card enumerates as a serial device running at 9600 baud, and plays a simple tetris game. Code for the business card is based on ArduinoTermTetris by Johannes le Roux available here: https://github.com/dadecoza/ArduinoTermTetris The board also includes breakouts for most of the SAMD11D14 GPIO, as well as pads for a 32khz crystal for the onboard RTC.
I’m working on several different versions with various sensors and firmwares to extend the business cards functionality. All board files and firmware are published on my github: https://github.com/slapplebags/business-card
I’ve been doing a fair amount of work lately setting up Samba4 domains and can tell you from experience that it can be a pain. I started out using 64 bit Debian 7 installer and compiling Samba4 from source. This method is frustrating to say the least, there is a lot to go wrong if you don’t have your methods down solid. After setting up a few domains this way, I began looking around for a better way. That better way is the Sernet Samba4 appliance, available at http://www.enterprisesamba.com/samba4app/
The Sernet appliance is built on Debian and works fairly well. The issues I ran into with the Sernet appliance .iso however made it impractical. I found that the .iso installer has issues with some non-free drivers (NIC drivers on my dell server), and with XENserver 6 (display issues and trouble with XORG). After fighting with the issues for a while and not making much headway I looked for another way. In my searching I found angryelectrons automate script available at http://angryelectron.com/samba4-notes/
I ran angryelectron’s script on a vanilla 32 bit Debian 7 install and it works without much fuss, both in xenserver and on bare metal. The only issues I’ve found is a real lack of documentation or forums regarding Sernet’s appliance as far as installing and configuring Samba4. Below are some useful things I found while setting things up that may be useful to others who want to try building their own Samba4 domain.
Running angryelectrons automate script will ask you a few basic questions about your domain. After running the script I checked DNS resolution for my domain server by running the following commands (swapping mydomain for what you named your domain in the setup): #host -t SRV _ldap._tcp.mydomain.local.
result: _ldap._tcp.mydomain.local has SRV record 0 100 389 samba.mydomain.local. #host -t A samba.mydomain.local.
result: samba.mydomain.local has address 192.168.1.10
Where I ran int trouble was with the Kerberos config. The automate script doesn’t seem to complete the Kerberos setup and when I ran: #kinit administrator
I received an error that a KDC could not be found for the domain. Checking the Kerberos config: #vi /etc/kerb5.conf
I found it was not fully configured with only the following in the file:
[libdefaults]

default_realm = MYDOMAIN.LOCAL

dns_lookup_kdc = true

dns_lookup_realm = false
To get the Kerberos setup completed I added the following lines to the bottom:
[domain_realm]
.mydomain.local = MYDOMAIN.LOCAL
mydomain.local = MYDOMAIN.LOCAL
After adding those lines to my krb5.conf I got the expected output from: #kinit administrator
result: Warning: Your password will expire in 41 days on Tue Mar 5 15:23:03 2013

From here its just a matter of editing your smb.conf to add shares and printing if you so desire. This is where I ran into another little hiccup that I couldn't find any documentation on, namely which smb.conf the Sernet appliance uses. I ran:
#locate smb.conf
and got 4 or 5 files in response. After some trial and error I found the Sernet appliance uses the smb.conf located at: #/opt/samba/etc/smb.conf
and to restart the Sernet appliance Samba: #/etc/init.d/sernet-samba4 restart
After these minor things I was able to get my Samba4 domain up and running in under 20 minutes, not bad for a free Active Directory domain. Once everything is up you can you the standard microsoft RSAT to add users, logon scripts, share permissions and all the usual fun stuff.
I thought I’d share a personal project / build log I’m working on and I’d thought I’d post the outline of it here and update it as I go. So here’s the basic idea, I want to build a home automation server and media center. For the base system I have chosen:
JetWay JNF9J-Q87 motherboard with 16GB of RAM
5 Western Digital Red 4TB SATA hard drives in a software RAID 5 for the NAS
Intel Haswell Core i5 processor
Crucial M500 120GB MSATA SSD for the boot partitions
and a Fractal Design Node 304 case
Aeon DSA02203-ZWUS Z-wave controller
Cisco SG300-10 managed gigabit switch
ALIX.2D13 DIY Kit pfsense router
Digital Ocean VPS droplet
Intel Nuc for LinuxMCE thin client
Using this hardware I plan on building quite the home network. My home server will run Xen Server 6.2 at its base, with several virtual machines running as guests. The VMs include a Debian 7 machine running Samba4 for a domain controller and file server, freepbx for my home phone system, Debian 7 for a freeradius, Linux MCE for a media center controller and home automation center, and a Debian 7 machine running nagios and cacti for system monitoring. The VPS will be running a seedbox, cacti and nagios for remote monitoring. The Alix board will be running pfsense as a firewall / router as well as an OpenVPN server for a secure connection to my VPS as well as secure remote access from outside my network. I will also be purchasing a number of Z-wave devices, light switches, outlets, and the like so I can remotely operate appliances, lights, etc.
That’s the basic outline for the project, more info will be coming as the various parts are purchased and configured.
Update 1 3/27/14: Fun with Cacti
SO I was messing with cacti today and decided to add bandwidth monitoring on my DO VPS. I created the graph added data sources etc. and kept getting no graph. After some poking around I found that rrdtool was throwing an error saying: ERROR: mmaping file '/var/lib/cacti/rra/localhost_traffic_in_12.rrd': Invalid argument
I checked the file in question and found it blank, not super. I manually ran the rrdtool with the following info per the data sources debugging in nagios: /usr/bin/rrdtool create \
/var/lib/cacti/rra/1/8.rrd \
--step 300 \
DS:traffic_in:COUNTER:600:0:100000000 \
DS:traffic_out:COUNTER:600:0:100000000 \
RRA:AVERAGE:0.5:1:600 \
RRA:AVERAGE:0.5:6:700 \
RRA:AVERAGE:0.5:24:775 \
RRA:AVERAGE:0.5:288:797 \
RRA:MAX:0.5:1:600 \
RRA:MAX:0.5:6:700 \
RRA:MAX:0.5:24:775 \
RRA:MAX:0.5:288:797 \
and there was my error. There seems to be a known bug in cacti that it adds the last “\” when it should not. If you manually run the same commands from terminal but leave off that last slash then everything is happy and you get a graph. After some patience it looks like just waiting 5 minutes for this to poll again it does create the file even though it initially creates this error, strange. I had a bit of a tough time with the cacti / pfsense graphs but this link: http://www.spoonapedia.com/2010/03/how-to-setting-up-virtual-cacti-snmp.html
got me through it.
Update 4/16/14:
Case and mother board have arrived, and been assembled. Pictures coming soon.
I am pleasently surprised by the quality of the case. The photos I have seen of the Fractal Design Node 304 made me think the hard drive holders were plastic but they are in fact metal. A nice touch that bodes well for the longevity of this box. One minor issue is the case came one screw short for holding the motherboard down but I was able to scavenge a spare from one of the many dead computers laying around the hackerspace. The RAM and CPU will be ordered shortly, after that its the 120gb MSATA SSD boot disk and I can get cracking on the installation.
On the VPS front I installed the OTRS ticket system and the iphonehandler plugin to allow app access from android / ios devices. I have used RT4 for ticket tracking in the past and found it adiquate, but OTRS has some nice features and I thought I would give it a shot. Installation is a straight forward apt-get install and went off without too many issues. The iphonehandler plugin can be installed through OTRS’s built in packaging system and was a breeze. To access the ticketing system from my Nexus5 I am using an app called DS Helpdesk. DS Helpdesk is available for free on the andoid market and also has a $15 paid for version. The app requires a file at /usr/share/otrs/var/ called RELEASE.iphonehandle be created as it does not create on automatically. Without it the android app will complain and not allow access. After creating the folder I can now open the app on my phone and view / edit / and create tickets.
I have also set up my OpenVPN tunnel from my home pfsense box to the VPS and have nagios monitoring the pfsense box as well as cacti graphing bandwidth, CPU load, and RAM usage. To help me keep an eye on things I acquired an old atom netbook with a dead backlight and set it up as a dashboard to rotate between my nagios hosts list and my cacti graphs to I can quickly spot issues. More coming on that in the next update.
Update 4/28/14:
Anyone interested in LinuxMCE 1004 I am now the second seed of a torrent .iso file if you dont want to wait for an http download. Torrent can be found here: http://www.sumotorrent.com/en/details/8678570/LinuxMCE-1004-final.iso.html
Update 8/13/2014
Despite the lack of updates this is still very much so an active project. A lot has happened in the last week with this project that may be helpful.
VM:
So after some fiddling I found that the Debian Samba4 VM’s DNS would break after rebooting. After some fiddling i found that network manager was breaking things with its auto configure nonsense, so I removed it. to do so i ran the following:
<code>/etc/init.d/network-manager stop</code>
and
<code>update-rc.dnetwork-manager remove</code>
(credit to http://xmodulo.com/2014/02/disable-network-manager-linux.html for the pointers)
after which you will have to configure /etc/network/interfaces and manually setup your network interfaces. After removing network manager I had no further DNS issues.
After getting that straightened out it was on to adding my 3TB HDD’s to the debian Samba4 VM. The version of xenserver I’m running (6.2) didnt want to let me create a VDI with larger than 2TBs of storage, not to mention my plan of RAIDing the disks would be silly to do with VDI’s. I found this guide (http://techblog.conglomer.net/sata-direct-local-disk-access-on-xenserver/) on how to attach a HDD directly to a VM withou VDIs which will allow me to setup a RAID and use the full 3TB disk capacity.
HTPC:
I decided to ditch LINUXMCE as I had some issues installing it on my NUC and go with XMBCbuntu instead. THis gave me my media center but I still needed a frontend for the zwave system. I found homegenie (http://www.homegenie.it/) a free and open source .net based frontend for zwave with linux and mac versions as well as android and iOS apps for controlling it. After installing mono which was slightly painful I had a working frontend for my zwave system. I also ordered my first zwave device and will be posting more soon on getting that up and running.
Remote Server:
I added some things to my remote digital ocean VPS as well. Modifications include installing deluge and couch potato for tracking all my torrents. In addition I will be installing a bit of software called caketop developed by a friend / co-worker Alex Standke. Its a neat little project which basically gives you a netflix like frontend for all your media files, check it out at: https://github.com/XanderStrike/caketop-theater
Yet Another Update
8/28/14
So I’ve managed to build my RAID 5 and get it running and mounted to all the various machines that need access. In the process of testing I learned an important lesson: OpenVPN traffic shaping is good. I would push large files from my Digital Ocean server to my RAID array over a VPN and found that the VPS would become unresponsive while transferring. I though maybe I was macing out the RAM so I upgraded to the next tier up VPS, 1GB RAM and a faster processor, another test resulted in the same. After checking my Cacti logs and router logs I found that the VPS with its mighty 1GBPs pipe to the internet was saturating my poor 50MBPS connection at home via the VPN. I limited the VPN tunnel to 3MBPS and tested again and found that it resolved my issues.
SBHX co-founders Steve Phillips and Mike Bales recently did an interview with KCBX in San Luis Obispo on their Central Coast Voices program. The topic of discussion was the Maker/Hacker movement. The program consisted of host Fred Munroe, SBHX’s Steve Phillips and Mike “swiss” Bales, as well as SLO Makerspaces CEO Clint Slaughter.
The hour long program covers the history of hackerspaces, their origin, and their mission. The program is available for listening here.
Hey Everyone, go check out our latest youtube sensation: https://www.youtube.com/watch?v=r7USxSXoA30
Some Background:
We got the chance to play around with a Phantom high speed camera and decided filming electrolytic capacitors blowing up would be a great subject. So we setup a table, power supply, and some lights and started the explosions. We used some old 330uf electrolytic capacitors, which were unvented and reversed biased them. After a few seconds the electrolyte boils and builds up enough steam pressure to blow off the can. Estimated speeds from watching the film puts the can at around 300mph after they explode.
Safety Warning:
Don’t blow up capacitors on purpose, steam, metal, and (depending on the capacitor, paper in our case) will go flying everywhere. We took all the usual safety precautions, filming from a distance behind a shield, goggles, fire extinguishers, etc.
Over the weekend we built a WiFi guest code generator for our Unifi wireless network. The setup is built around a Raspberry Pi and USB thermal receipt printer. You can see the build in action below:
The Raspberry Pi runs a simple python script waiting for an input from the button press. Once pressed the script contacts the Unifi controller, requests a wireless access code, adds some formatting and prints. The code for the Raspberry Pi and Unifi can be found on GitHub. The thermal printer is available from Amazon.
The button requires only 3 pins on the Pi to be connected and a 10k ohm resistor. Pin 2 (3.3V) pin 5 (Ground) and pin 7 (GPIO 14 / TX). Pin 2 is used to Power the button LED and provide the positive rail for the common pin on the momentary switch. Pin 5 to provide a ground for the LED and to connect one side of the 10k ohm resistor to. And pin 7 to be connected to the Normally Open (NO) pin of the switch as well as the other leg of the 10k resistor to prevent the GPIO pin from floating. We used a 2×5 pin female 2.54 mm (.1″) connector and some 22 gauge wire to connect everything.
Here’s the fritzing verion:
Close up of the completed wiring harness on the Pi for reference:
Now that everything is connected together, it’s time to install the software that powers it.
Setting Up the Controller
The script that runs on the controller accesses the controller’s MongoDB database directly, so first, install git as well as the library for that. Our wireless controller runs CentOS, where the commands to do that look like the following:
The script needs to know the internal ID number of the site in your Unifi controller in order to add everything to the database correctly. Once you have this number, open the script in your favorite text editor and edit the UNIFI_SITE line.
[code light="true"]
# ed voucherator.py
[/code]
Finally, install the script and tell systemd to run it when the system boots.
Don’t forget to allow traffic through the controller’s firewall if necessary. By default, the script uses TCP port 8080.
With the controller’s setup complete, it’s time to set up the Raspberry Pi to manage button presses and the receipt printer.
Setting Up the Pi
To install the script on the Raspberry Pi open the terminal or SSH in from another computer.
Next, install the script’s dependencies that are packaged as part of Raspbian. These commands will vary if your Pi happens to be running another operating system.
The top of the button-managing script has a couple settings that you should tweak as well.
[code light="true"]
$ ed buttond.py
[/code]
At a minimum, you should edit the VOUCHER_URL setting to tell it where to find your voucher-creating server. For example, if you need to access it using the IP address 192.0.2.1 then that setting may look something like the following:
The script also assumes you have a cool logo installed at /srv/voucherprinter/logo.jpg. If you have such a logo and you put it somewhere else instead, edit the LOGO_PATH setting. If you do not have such a logo, comment out the line of code that attempts to print it further down in the script. We should improve this in the code later.
Next, install the script and set it up as a service so it can run when the Raspberry Pi starts:
After much work designing and testing a new revision of the Tracksoar has been released. Version 1.2’s biggest change is moving from two separate sensors to measure temperature, pressure, and humidity to a single single sensor. In addition some minor changes have been made to the layout to improve reliability and firmware to free up RAM and ROM.
The biggest driver behind the update is the BMP180 pressure sensor which has reached its end of life and is no longer in active production, making sourcing them a challenge. To resolve this issue the we have moved to the BME280 temperature, pressure, and humidity sensor. The BME280 is also easier to solder than the two previous sensors, draws less power improving battery life, improves accuracy, and speed at which data can be polled.
The new version is available now in our shop, and the full source is available here.